
When your V-brakes start misbehaving and they lack performance, your first thought might be to just take it to the shop to be fixed. In most cases, however, V-brakes are actually very easy to fix and only require a little adjustment to get them working like new again!
Check your brakes regularly
It’s a good idea to quickly check your brakes from time to time instead of leaving them until they get to the point where any problems are really noticeable. Without periodic adjustment, the pads can wear at awkward angles which can make them tricky to re-adjust or even render them useless and in need of replacement.
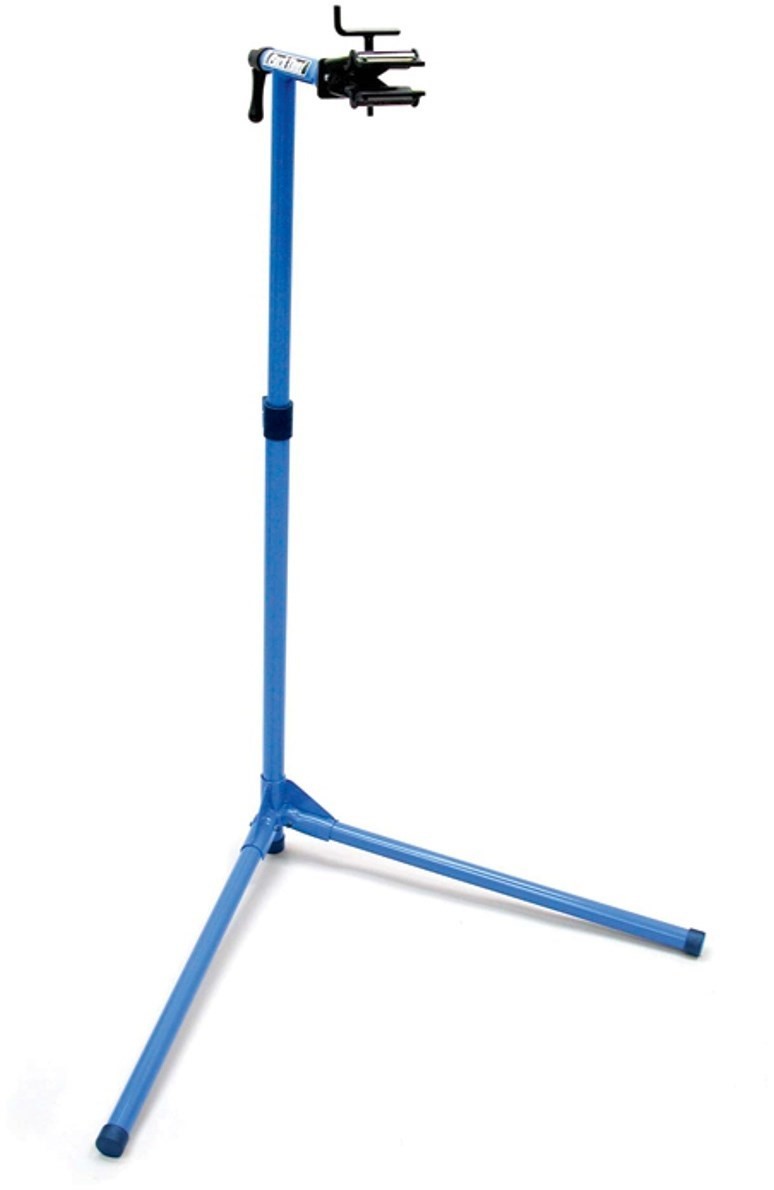
It is worth noting that if you’re planning on doing your own repairs to your bike, a great investment would be a bike maintenance stand. They not only hold the bike still but bring it up to a level that makes it a lot easier to work on.
These four steps will fix virtually any problem you have with your V-brakes. You don’t necessarily have to complete them in order, but for troubleshooting an unknown problem this is a reliable way to approach them.

Step one
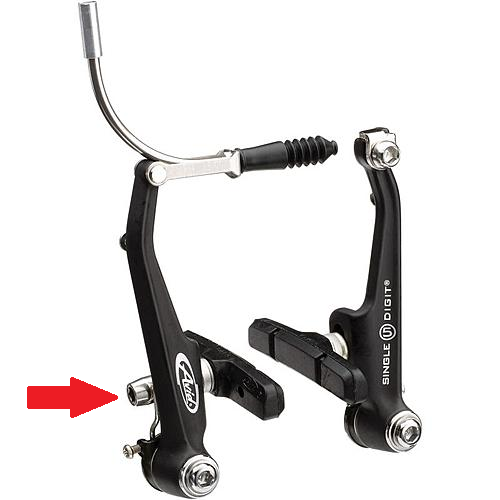
Before you begin making adjustments, pull your brake lever and check that the brake pads are actually making contact with the rim. If they do then you can skip to step two, but if not you need to tighten the cable.
Wind the barrel adjuster on the brake lever most of the way in (clockwise) and loosen the bolt (see diagram) holding the cable onto one of the brake arms. Pull the cable through to bring the pads closer together, but don’t pull so much through that the pads are touching the rim. Tighten the bolt back up.
While pulling the cable through it’s easier if you use your other hand to squeeze the brake arms closer together, otherwise they’re going to want to spread apart which will make things worse. Once you’ve done this and the pads hit the rim when the brake is applied, move on to step two.
Step two
Over time V-brakes will gradually become poorly aligned as they wear down, which can cause a weak & squishy feeling in the brake lever. In this step you’ll discover how to re-align your brakes.
This image shows a typical V-brake. Modern V-brakes use the same design when it comes to pad fitment, so don’t worry if your brake is a different make or model to the one pictured.
To realign the pads, you’ll need to line them up so that when brakes are on, the pads hit the rim flat. A great trick to this is to loosen the pads, pull the brake lever with one hand, and with the other hand move the pad until it’s lined up correctly.
With the brake lever still pulled, gently tighten the bolt back up a small amount, but don’t fully tighten it yet. Release the brake lever and use one hand to hold the pad still while you finish tightening it up. If you try to tighten the pad up while holding it against the rim it will inevitably slip and twist itself out of alignment, so you’ll only have to do it again anyway.
Once you’ve done this for both pads, pull the brake lever and check to see that the pads and arms are in contact with the rim symmetrically on both sides. It doesn’t have to be absolutely mirror-perfect, but do the best you can. You should now also get a nice positive feeling of the bite point through the brake lever.
Step three
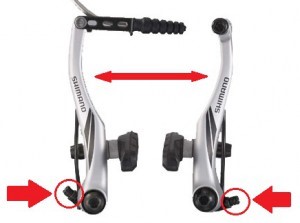
Next up is to check that both the right and the left pads touch the rim at the same time. If they don’t your pads will wear unevenly and can even result in one of them dragging against the rim, creating friction and slowing you down. This is fixed by adjusting the return springs which retract the brake arms away from the rim. It’s a nice and simple job to do, although it can be a little time consuming. It’s also very rewarding once you’ve got it just right!
Most V brakes require a Phillips (+ head) screwdriver to adjust the springs (circled), but occasionally some models use a small allen key. Tightening the screw (clockwise), will put more pressure on the spring and make the brake pad move away from the rim further. Loosening the screw (anti-clockwise) will slacken the spring and the pad won’t pull away from the rim as far.
There are spring tensioner screws on both brake arms, so you’ll need to adjust both incrementally until you find the right balance. Any changes you make to the tension on one side will have a direct effect on the other side. i.e. if you tighten the spring on the left, that pad will pull further away from the rim, while the right pad moves closer to the it. Likewise if you slacken the spring on the left side, that pad will move closer to the rim but the right pad will move further away.
Try to avoid simply tightening the springs all the time to get an even balance, as the extra tension in the cable will cause it to stretch more over time. Similarly if you just loosen them, you might find your brake lever doesn’t always return to the centre position as quickly as it should. Try to balance the left & right springs somewhere in the middle of their adjustment ranges.
Step four
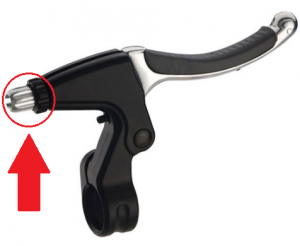
With the cable tightened, the pads adjusted and the springs balanced, the final step is to fine tune the brake lever to your preference. This step shouldn’t require any tools; however, you may need some pliers for added grip on old barrel adjusters if they have seized.
Adjusting the brake lever is done by winding the barrel adjusters (indicated) in or out. You’ll notice two things about the barrel adjusters.
• There is an additional threaded ring on the outside of the barrel itself.
This is a lock ring which stops the vibrations of the bike turning the barrel adjuster by accident. Once you’ve got the barrel adjusted the way you want it, tighten the lock ring in towards the brake lever as much by hand. Don’t use He-Man strength or pliers to help you do this – the lock ring doesn’t need to be very tight and you could risk stripping the threads or not being able to slacken it at a later date.
• Both the barrel and the lock ring have a slot in them.
These slots, along with a gap in the body of the lever, allow the brake cable to be fitted without having to completely disassemble the brake lever. Try to avoid lining the slots up with each other and the lever body at the same time, otherwise there is a possibility of your brake cable falling out.
Winding the barrel into the brake lever (clockwise) has the same effect as increasing the length of the cable, so your brake lever will pull further in towards the handlebar as you apply it. Conversely, if you wind it out from the brake lever (anti-clockwise) it’s the same effect as shortening the cable, so the brake lever won’t pull in to the handle bar quite as far.
Adjust the barrels on both brake levers until you’re happy with the way they feel on the handlebar. There’s no hard & fast rule as to how the levers should be adjusted, as long as they feel right to you.
If you find that you run out of adjustment before the brake lever pulls into the handlebar far enough, you need to repeat step one and let a little more cable pass through the arm before you tighten it back up. If you can’t adjust the brake lever so that the bite point is far enough away from the handlebar, repeat step one and pull a little more cable through the arm.
A job well done!
And that’s it! Remember to keep checking your brake pads for uneven wear and if the grooves in the friction material wear down completely it’s time to replace them. If you need any further help or advice with your brake pads, please feel free to use our Live Help service at the top of the page, or you can call us on 01792 346503.