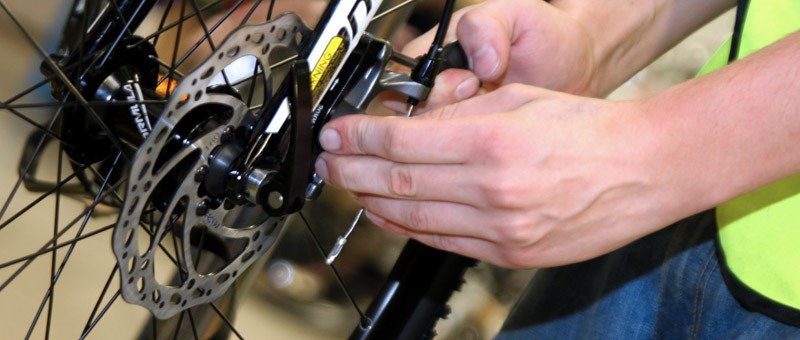
Disc brakes were revolutionary when they first appeared on mountain bikes, and are now popular on road bikes too. However, poorly aligned disc brakes can easily ruin the feel & performance of your bike. Here’s how to get it right.
If you’ve ever suffered a rubbing disc brake, you’ll know how annoying it can be. That slight kiss from the disc onto your brake pads and the accompanying squealing/scraping noise can drive you mad. In severe cases you’ll be fighting every pedal stroke as your brakes slow you down, and your pads will wear out quickly and unevenly.
Bicycle disc brakes can be broken down into two categories depending on how they operate:
- Mechanical disc brakes (aka cable disc brakes)
- Hydraulic disc brakes
The procedure for correctly aligning your disc brakes depends on which type you have.
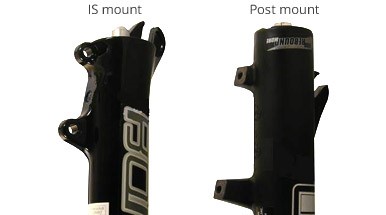
Post mount vs IS mount
Note: This guide only covers flat-mount and post-mount style disc brake calipers. Older IS mount calipers are aligned by using washer spacers of different thicknesses and flat-facing the eyelets with special tools. IS mounts are difficult and time-consuming to align perfectly.
We recommend seeking the advice of a professional mechanic with access to advanced tools to align IS mount calipers.
Aligning mechanical disc brakes
Cable disc brakes are less tricky to align and maintain than hydraulic disc brakes. However, they require almost constant maintenance to keep them operating at their best.
Don't be daunted by the number of steps involved when aligning your cable disc brakes. It's a very methodical process, and is far less frustrating for novice mechanics than hydraulic disc brakes.
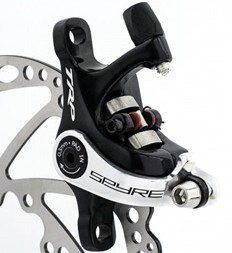
Most mechanical disc brakes only have a single moving piston, although some high-performance brakes (like the TRP Spyre/Spyke range) feature twin pistons which have their own system for brake pad alignment. This is covered separately
Unlike hydraulic disc brakes, mechanical disc brakes are not self-aligning so will need periodic adjustment of the brake pads and cable tension to compensate for wear.
To align a single-piston mechanical disc brake, you will need:
- Torque wrench with a set of allen bits (4mm, 5mm, or 6mm usually)
- Rubber band
- Stiff card (old greetings card or business card)
- Wind the barrel adjusters all the way in – there will be one on the brake lever and (depending on model) one on the caliper
- Retract the inboard fixed brake pad away from the rotor (i.e. nearest the wheel spokes). This is the fixed pad - Shimano brakes typically use an allen-headed bolt, whereas Avid’s BB5/BB7 have a large red dial
- Slightly loosen the bolts holding the main body of the caliper to the frame/fork/adapter. Just enough to allow you to slide the caliper around
- Slide the caliper body around until the disc rotor is passing through the centre of the gap in the caliper (not the centre of the gap between the pads)
- Tighten the caliper body bolts back up carefully. Tightening these bolts can often cause the caliper to move around, so it’s recommended to take it in turns tightening each bolt 1/4 of a turn using a torque wrench until the desired torque is reached
- Wind the fixed pad back in towards the rotor until you can hear it gently touching the rotor while the wheel spins, then wind it back out in small increments until it runs silently
- Slacken the cable clamping bolt on the caliper arm
- Place the piece of card between the outboard brake pad and the disc rotor
- Use the rubber band to hold the caliper arm in the 'on'. Just a light actuation is what you’re looking for
- Pull the brake cable through the arm lightly, then clamp it back down.
- Remove the rubber band and the piece of card
- Wind out the cable barrel adjuster until the bite point on the brake lever feels comfortable.
Aligning the TRP Spyre/Spyke
- Wind in the barrel adjuster(s) all the way in
- Slacken the cable clamping bolt on the caliper arm
- Pull the cable through tight, then clamp it down
Note: Avoid manually actuating the caliper arm while doing this – allow it to rest - Wind in the pad adjustment bolt on each side until you hear it rubbing the disc, then turn it back in small increments until the noise stops
- Wind the pad adjustment bolts out a small but equal amount on each side
- Wind the cable barrel adjuster out to set the desired bite point on the brake lever
- If the bite point cannot be set close enough to the handlebar, repeat steps 5-6
Aligning hydraulic disc brakes
Once set up, hydraulic disc brakes are self-centering, meaning you don’t need to make periodic adjustments to the pads. When you pull the brake lever, the fluid will pump from the master cylinder into the brake caliper, pushing the pistons in towards the rotor.
If the brake pads are slightly off-centre, the one which makes contact with the rotor first will be stopped in place, while the other effectively catches up. With both pads now firmly against the rotor, when the brake lever is released both pistons/pads will release from the rotor simultaneously.
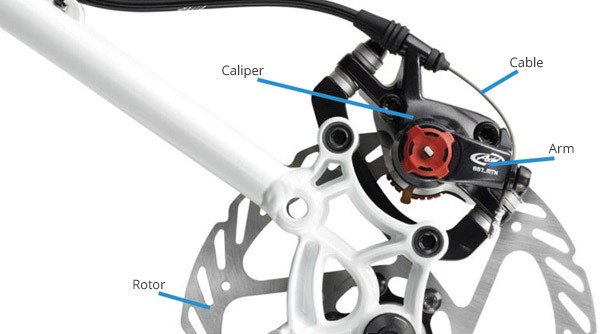
Initially, however, the caliper still needs to be correctly aligned to ensure the pads contact the disc brake evenly, without any rub.
- Wind the barrel adjusters all the way in – there will be one on the brake lever and (depending on model) one on the caliper
- Retract the inboard fixed brake pad away from the rotor (i.e. nearest the wheel spokes). This is the fixed pad - Shimano brakes typically use an allen-headed bolt, whereas Avid’s BB5/BB7 have a large red dial
- Slightly loosen the bolts holding the main body of the caliper to the frame/fork/adapter. Just enough to allow you to slide the caliper around
- Slide the caliper body around until the disc rotor is passing through the centre of the gap in the caliper (not the centre of the gap between the pads)
- Tighten the caliper body bolts back up carefully. Tightening these bolts can often cause the caliper to move around, so it’s recommended to take it in turns tightening each bolt 1/4 of a turn using a torque wrench until the desired torque is reached
- Wind the fixed pad back in towards the rotor until you can hear it gently touching the rotor while the wheel spins, then wind it back out in small increments until it runs silently
- Slacken the cable clamping bolt on the caliper arm
- Place the piece of card between the outboard brake pad and the disc rotor
- Use the rubber band to hold the caliper arm in the 'on'. Just a light actuation is what you’re looking for
- Pull the brake cable through the arm lightly, then clamp it back down.
- Remove the rubber band and the piece of card
- Wind out the cable barrel adjuster until the bite point on the brake lever feels comfortable.
A common “trick” to aligning a hydraulic brake caliper is to slacken the mounting bolts slightly, pull the brake lever hard while the caliper is free to move, then tightening the bolts back up while the brake pads are firm against the rotor.
This method is highly unreliable and rarely results in accurate alignment. With a little bit of patience without taking any shortcuts, aligning your brake callipers is a job you will only have to do once.
If you have any questions about aligning your disc brakes, you can call us on 01792 346503 or feel free to use our Live Help service at the top of the page.